Monday, December 31, 2012

Doc McStuffins Birthday

My daughter Luci is slightly obsessed with the Disney cartoon Doc McStuffins. Thankfully it isn't one of those kids shows that make you want to scream. The show is only on it's second season so there are no licenced birthday decoration in the stores. Many vendors on Etsy are making decorations and invitations but that just wasn't in my budget this year. With a little Internet searching, a color printer and a pair of scissors I managed to create some fun birthday decor. In the end this whole birthday party (including food) cost me less than $100 which is pretty good considering I fed 4 kids and 6 hunger adults!

My main source was Ebookbrowse.com where I found a whole page of Doc Mcstuffins printables from various websites. The bulk of the items I chose came from Disney Jr webpage. Here's what I came up with:
I mounted these "cupcake toppers" on tooth picks to use on the cake.

Gum paste 2 with a little luster dust.

Doc ID cards for all the kids.
I also used the Doc Bandage that was on the top corner of all the pages I printed
as decoration for the cups.

Finished cake

Place settings


Friday, June 22, 2012

Pinterest IS Yum Yum Yummy!

Everyone knows about the wonderful Pinterest, how addictive it is and how you can spend an entire day messing about. I LOVE it. It's like having a million magazine to flip through but instead of keeping them in a huge stack for 5 yrs, you can tear out what you like and keep it safe and organized. The genius behind Pinterest really should win a Noble Peace Prize. Think about that statement and I am sure you or your spouse will agree.

The one thing about Pinterest that I have heard from friends is they pin and pin but never make. While I haven't set a goal for myself or anything I have been making an effort to try the recipes I pin. Sometimes I search out and pin recipes I have tried in the past and love for you, my dear pals that actually read this rambling craziness.

Last night was a double Pinterest whammy. I made a yummo Chicken tortilla soup (with some changes) that I had found a while ago and used chicken from another Pinterest recipe I had made. You really need to make the crockpot Chix Tacos because they are super yummy. So far I have made this twice and the leftovers are even good cold in a wrap for lunch. If I am saying leftovers are good take it seriously. One thing to take note: this last time I made this recipe I used a ton (2 packages) of chix so I would have extra to freeze but did not increase salsa or taco seasoning. MISTAKE! The second batch wasn't as flavorful and was missing the kick of the first batch.

Now the soup! I found this Chicken Tortilla Soup recipe on pinterest as well. It's from a beautiful website that I recommend checking out. I had to alter the recipe because I wasn't able to find some of the items in my local shop and didn't have time to go to the Base to get US ingredients. I wanted to use what I had in the pantry. Here is what I made:

2 Tbsp olive oil
1 small yellow onion, chopped
3 cloves garlic, chopped
1 small carrot, chopped
1 can chopped tomatoes with green chilies with most of juice drained
6 cups chicken stock
Corn tortilla chips (rinse off salt)  or 6 corn tortillas torn
1 1/2 c. frozen corn
Crock pot Chix Taco meat

Toppings:
tortilla chips, cheese, sour cream, green onion, avocados

Cook onion and carrot in pot till soft and add garlic and cook a min or two. Add can of tomato's and let cook for a min then add chicken stock and corn. Bring to slow boil, then add tortilla chips and continue to simmer.

Puree the soup in blender till smooth or leave it a little chunky. Add soup back to pot to warm and thicken if needed.

Place chicken in bowl and pour soup over top. Add toppings, eat and enjoy!

Monday, May 28, 2012

Chocolate Truffle Cupcakes

Some of my friends have requested the recipe for my Chocolate Truffle Cupcakes. Here's a quick tutorial on how to make them and I hope you enjoy!
(DISCLAIMER: I do not claim that this is an original recipe that I created. I am sure someone out there has done this before)


First start by making some YUMMY chocolate Ganache. I use 70% dark chocolate and a tiny bit of milk chocolate but you could use what you prefer.
8oz. chocolate and 8oz Heavy cream
I have started using a scale for measurement. 

Chop your chocolate up.

Heat your heavy cream till it just starts to lightly bubble and pour it on top of your chocolate. Whisk till smooth, set it aside and let cool while you make your cupcakes.

Make whatever chocolate cupcakes you prefer.

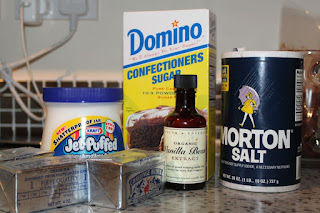
Here are the ingredients needed for your marshmallow buttercream.
3 sticks unsalted butter at room temp.
1 7oz jar marshmallow fluff
3 C. sifted powdered sugar
2 tsp. vanilla extract
pinch of salt
There are many recipes for buttercream. You could taste this with 2 C. pwd sugar and see if you prefer that or you could add more. No rules!


After the cupcakes have cooled cut the middle out with a pairing knife (or buy a fancy cupcake corer or use an apple corer) Don't go too deep (I made that mistake with this batch). Keep the part your cut out because you will need it.

This step is a little time consuming and probably not necessary but this is how I do it.
Cut the excess off and save a little lid for your hole.

When the ganache is cool and has started to thicken up fill the cupcakes. You could put the ganache into a piping bag to make it a little easier.

Put the lids on.

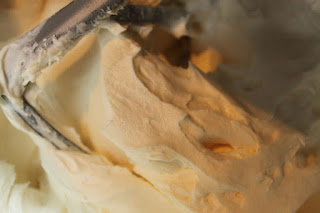
Top with the buttercream and let them set. Both time I have made these cupcakes they weren't consumed until the next day which gave the ganache time to set up like a truffle. 

I hope you enjoy!